This tutorial will walk you through the process of making an okedo head, from determining the dimensions of your head to stretching it over the ring, sewing the double stitching, and punching holes for the rope. Keep in mind that you will need to make two heads, one for each side of your okedo, so you’ll repeat this whole process twice. Making a head is also quite a time-consuming process, so be prepared to devote a full day or at least an afternoon (3-10 hours, depending on your skill level) to it. Since the head must be stretched and sewed before the hide dries, it’s important to make sure that your cowhide stays moist at all times. Keep moist towels handy to refresh the hide if necessary.
PAGE MENU
TOOLS AND MATERIALS REQUIRED
STEP 1: DETERMINE HIDE DIMENSION
STEP 2: PREP RINGS AND HIDES
STEP 3: CREATE TEMPLATES
MATH TO FIND STRETCHING HOLE MARKS SPACING
Tools and Materials Required:
- hide cut to proper dimensions
- steel ring (made from 5/16″ dia. rod)
- leather punch
- razor blade or X-Acto knife
- spring clamp (2″ is a good size)
- white rust-inhibiting primer
- lubricant (e.g. K-Y Jelly)
- heavy leather sewing needle or leather sewing tool
- synthetic sinew
- nylon string (do not use cotton)
- chalk
STEP 1: Determine the Hide Dimension

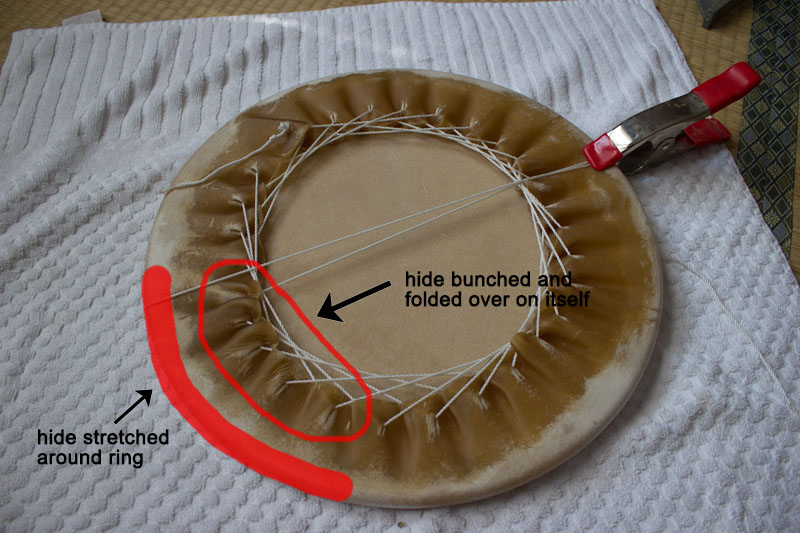
The hide dimensions are determined by two things: the size of the ring and the size of the shell. The hide needs to fold over the ring and stretch well past where the shell will be placed. As the hide is stretched over the ring there will be a region where the hide folds over on itself. The majority of this section should fall within the shell diameter so that it will be trimmed off.
The hide will also have holes punched the whole way around for the rope. These holes are located approximately 3/4″ away from the outer diameter of the folded over hide before it is trimmed.
Calculations:
For example, a drum with a 15 1/4″ OD ring and a shell with a diameter of 12″ would need a hide with a diameter of at least twice the difference between the ring and shell diameters plus twice the tensioning rope distance added to the ring diameter. This would be:
15 1/4″ + 2(15 1/4″ – 12″) + 23/4″ = 23 1/4″
Note that using a smaller shell with the same size ring requires a larger diameter hide (or more of a stretch). Keep in mind that depending on the thickness of the hide the amount of stretch will potentially vary quite a bit. If you cut the hide too small, there is no going back, if you cut it a little large to start then you can always trim it down if necessary.
STEP 2: Prep Rings And Hides
Prepare your rings in advance by doing the following:
- file down any protrusions or burrs from the weld
- sand the rings completely (~100 grit sandpaper)
- clean the rings by washing and wiping it dry
- painting the rings with a few coats of rust-resistant white primer
- allow adequate time for the primer coats to dry and sand finish smooth with fine sandpaper (220+ grit). Focus on sanding down any protrusions, be careful not to sand through the finish.
Prep Hides
Prepare your hides in advance by soaking them. If they are thick hides, such as cowhide, soak for ~ 8 hours, if the hides are thinner such as calfskin or horse hides, a 2-4 hour soak is adequate. Your hides may vary a lot, if it is not completely flexible then continue to soak. Inadequately soaked hides are very difficult to stretch. You can add a little bleach to the water to prevent anything from growing…a weak solution of 2% bleach is sufficient to sanitize a surface, but isn’t necessary.
STEP 3: Create Templates
ROPE TENSIONING HOLE TEMPLATE
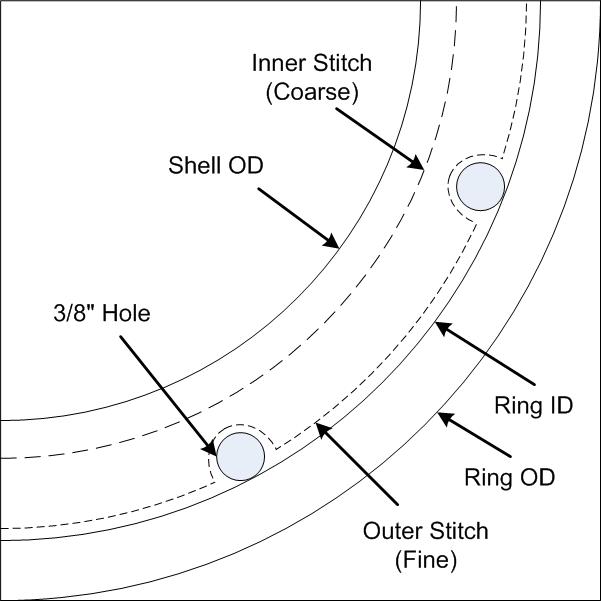
Preparing a template for the rope tensioning holes should also be done in advance. Put your ring on a piece of tagboard and trace the inner and outer circumference on the tag board. Now place the shell on the tag board centered in the ring and trace the outer diameter of the shell.
If you are using 5/16″ diameter rope then you will want to cut 3/8″ holes. Decide on the number of holes to use, 10-12 holes is common. Draw the 3/8″ diameter holes at equal distances around the inner diameter of the ring. There will be two stitch lines, the first along the ID of the ring and around the rope holes and a second one closer to the outer diameter of the drum shell. There needs to be enough space between the second stitch and the shell to accommodate the leftover hide after trimming.
STRETCHING LINE HOLE TEMPLATE
It is also very helpful to prepare a template for the stretching line in advance. The template is prepared by first deciding how many stretching holes you want around your perimeter. The more stretching holes you have, the less strain there will be on any particular hole and the less chance there is for a tear. Larger heads need more holes for an even stretch.
Cut out the stretching holes with a leather hole punch (one like this)
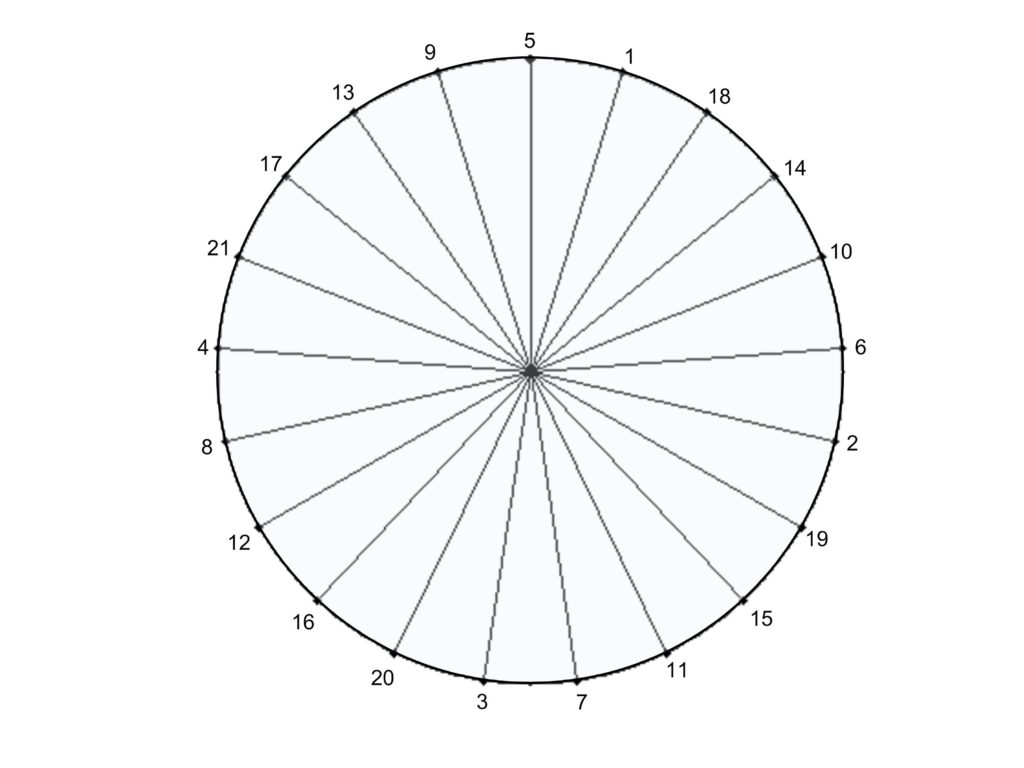
Below is an example template for a 21 hole pattern with the string order marked. Use a compass with the appropriate distance measured from a ruler and mark the circumference of the circle, if you don’t end right at the mark you started on split the difference and and mark backward until the marks line up again and use those in the same way you would when marking for byou when heading a nagado-daiko.
(click on the template below for a full-size version)
The number of holes chosen is important. The string will be run around the perimeter of the head in such a way that it skips over a fixed number of holes each time and after completing each lap of the circumference it will line up with the next hole. The following patterns are viable options:
- 17 Holes: String Order is 1, 6, 11, 16, 4, 9, 14, 2, 7, 12, 17, 5, 10, 15, 3, 8, 13
- 21 Holes: String Order is 1, 6, 11, 16, 21, 5, 10, 15, 20, 4, 9, 14, 19, 3, 8, 13, 18, 2, 7, 12, 17
- 29 Holes: String Order is 1, 6, 11, 16, 21, 26, 2, 7, 12, 17, 22, 27, 3, 8, 13, 18, 23, 28, 4, 9, 14, 19, 24, 29, 5, 10, 15, 20, 25
The spacing between the marks along the outer edge can be determined with some simple trig. If you don’t care about the details of the math, skip to step 4.
MATH!!
The chord between each hole along the perimeter is the base of an inscribed isosceles triangle which can be split into two right triangles. The radius (r) of the circle is then related to half the chord length (c/2) by the sine of half the angle (theta/2) inscribed by the isosceles triangle. If a 21 hole pattern is desired, then 360 degrees needs to be split up into 21 isosceles triangles. The angle theta is then 360°/21 = 17.14°. The chord length (c) is given by the following: c = 2rsin(theta/2). A less exact method would simply be to divide the circumference on the circle by 21. The error between the two methods is ~0.57% for 17 holes, ~0.37% for 21 holes, and 0.20% for 29 holes.
So, for the three patterns above the chord length is related to the radius by:
- 17 Holes: c = 0.3675*r
- 21 Holes: c = 0.2981*r
- 29 Holes: c = 0.2162*r

